
With the advent of Infrastructure As Code and provisioning automation tools, cloud or virtual infrastructure has started becoming from immovable asset tomato a disposable asset. Teams are expected to bring up and tear down environment at will, and all of this without any errors in configuration or overall environment setup. While existing Infrastructure As Code scripts do a great job at this, the way they are developed has been worrying for me to say the least. Most teams resort to a write it, run it on a test machine and validate manually cycle for validating their automation code. This blog post is about how we can use Test Driven Development to write better Infrastructure automation code.
In this example:
First install the vagrant-serverspec plugin – it allows integrating ServerSpec tests into Vagrantfiles. Execute:
vagrant plugin install vagrant-serverspec
Now create a Vagrantfile and choose a base box. You may choose a box of your own, or you may use a ready-to-go Ubuntu 14.04 base box from Agility Roots which is prepackaged with essential configuration for Vagrant.
Add the following code to any directory of your choice
Vagrant.configure(2) do |config|
config.vm.box = "packer-ubuntu1404-base-2014-12-15-10-10-26_virtualbox.box"
config.vm.box_url = "https://github.com/agilityroots/vagrant-toolchains/releases/download/2017-12-15-ubuntu1404-base/packer-ubuntu1404-base-2014-12-15-10-10-26_virtualbox.box"

# validate vagrant box against spec
config.vm.provision "test", type: "serverspec" do |spec|
# specs are stored here
spec.pattern = '*_spec.rb'
end
This code:
With all this boilerplate, let’s create our first spec!
A “spec” or specification, is simply a set of acceptance criteria for our Vagrant box to be considered “Pass”. Let’s make up some acceptance criteria.Say we are creating infrastructure where SSH and Ansible are supposed to be present:
We’ll see how a spec can define these requirements into failing tests so that we are sure we have created the right set of expectations from our “to be” written Infra automation code.
Let’s write the spec file for this – name it base_spec.rb. (You can really name it anything, just ensure it matches the *_spec.rb pattern). The ServerSpec specification reads almost like English – but it does follow a certain syntax. Keep the ServerSpec tutorial handy and go through the tutorials if the code below does not make sense:
describe package('openssh-server') do
it {should be_installed}
end

describe port(22) do
it {should be_listening}
end

describe package('ansible') do
it {should be_installed}
end

describe command('/usr/bin/ansible --version') do
its(:stdout) {is_expected.to match("1.8.1.0")}
end
Now execute the command:
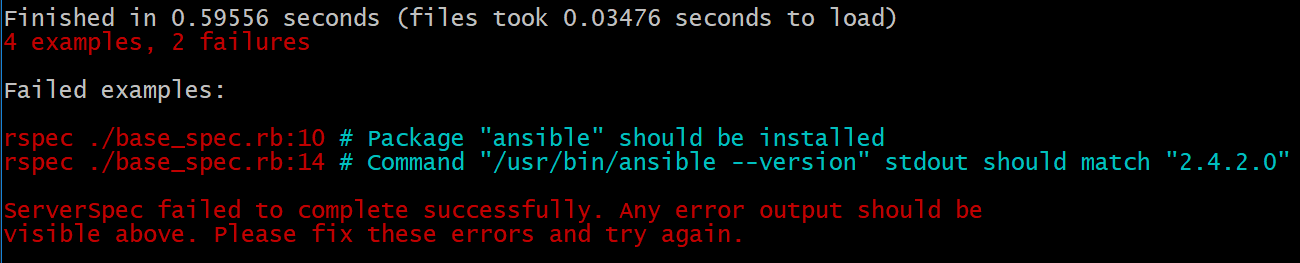
If all goes well, you should see that two specs failed:
Now let’s build the logic within our Vagrantfile to make our failing tests pass. In other words, let’s install Ansible, setup opens server and run it on port 22, In this simple example, we are using the Shell provisioner for Vagrant. A more in-depth example is available here and uses Puppet. From this guide, the method to install Ansible is as follows (insert this script into the Vagrantfile):
Vagrant.configure(2) do |config|
# ...
# ...
 $script = <<SCRIPT
 sudo apt-add-repository ppa:ansible/ansible
 sudo apt-get update
 sudo apt-get install -y ansible
SCRIPT

  config.vm.provision "shell", inline: $script
  config.vm.provision "test", type: "serverspec" do |spec|
  # ...
  # ...
 end
end
Now that you have written the code to install Ansible, execute:
` vagrant up –provision `
Your tests have passed – in other words, you have just used Test-Driven Development to build a Vagrant box with openssh and Ansible installed.

If you notice this cycle other than documenting the required configuration into specs which becomes a stringent guideline to writing the infra automation code; we are able to assert our automation indeed works without manually installing the code in a environment or verifying the expected changes; this leads to tremendous efficiency in creating such automation. Also note that with the application of TDD you can infrastructure that can be further developed and refactored as needed. You have to get into the habit of writing a failing test first. For instance, I can replace my “shell” provisioner with a Puppet provisioner, developing against the same spec each time, and be confident that my refactored code will meet the specifications.
This is merely one of the many ways TDD can be applied to Infrastructure code. Feel free to write to us with your thoughts on this post, or DevOps in general. We’d be glad to help!